How To Download Files From WordPress Media Library in 2020
WordPress has become one of the most popular platforms for users to create websites. This is because it’s a content management system that easily lets you run and manage your site while powering it up with thousands of plugins and themes.
You might think that there’s no reason to download the files in your WordPress Media Library for now. But don’t stop reading just yet. Even if you don’t know when you might need them, it’s still important to understand how to do it.
Why Download The Media Library Files?
Since tons of people use WordPress, you should take your website’s security more seriously. One of the ways you can do that is by backing up your site, including the media files. So if there’s a chance that you lose your website’s data due to unauthorized access, you can recover it with the files you have.
Other than security reasons, there will also be a time when you might need to transfer images between websites. So it’s useful if you already have the files needed or if you know how to retrieve them in the nick of time.
Ways to Download Files from WordPress Media Library
There are three methods with which you can transfer your media files from a website to your computer, whether it’s multiple images or to download a single image from the WordPress media library :
Hosting Control Panel
The safest way you can download your media library is by using the hosting control panel. You don’t need to use external tools like FTP clients or install a plugin to access the root directory.
For this tutorial, we’ll use Hostinger’s CPanel, which is similar to other industry standards like the cPanel:
1. Sign in to your hosting service’s admin dashboard.
2. Scroll down to the Files section and click on the File Manager.

3. Select public_html, then choose the wp_content folder.

4. To download the entire media library, just highlight the uploads folder and click the Compress button.

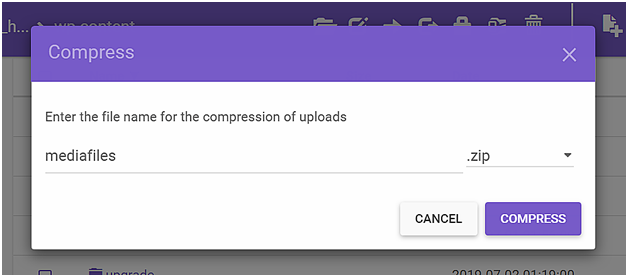
5. Name the file and select the .zip option, then click the COMPRESS button.
6. Highlight the ZIP file and finally click Download.

If you only need specific files, the process after step three is different:
a. Click on the uploads folder, your preferred folder. In the case of this tutorial, it is 2019.

b. Select the month folder (usually numbered).
c. Highlight the media file that you’re looking for and press Download.

- You can select more than one media file, and the process will be the same as steps five and six – archive and download.
FTP
If you want to access your website files without having to open a browser and sign in to your hosting account, then you’ll like the FTP method. FTP stands for File Transfer Protocol, and you will need to install a third-party FTP client on your computer.
The top free FTP clients are FileZilla (all platforms), WinSCP(Windows), and Cyberduck (Mac). This tutorial uses WinSCP as an example:
1. Go to your hosting dashboard, find the FTP Accounts button under the Files section, and click on it.

2. Create your FTP account and save the private FTP Access information.
3. Open the FTP client on your computer and fill in the required fields to connect to your website’s data.
4. Select the wp-content folder once you’ve logged in.

5. Highlight uploads, click Download, then press OK.

You will have all your media files transferred to your computer. If you need individual files, simply navigate to your uploads folder in the FTP client and select the files you want before clicking the Download button.
Plugins
Plugins are commonly used by all WordPress users, so if you’d rather streamline and do this through your dashboard, the option is there. The most popular plugin that allows you to access your website’s files is WP File Manager.
1. Install WP File Manager and activate it.
2. Click the WP File Manager section on the sidebar to view your public_html directory.

3. Select the wp-content folder and highlight the uploads folder before pressing Download.

Your entire media library will be downloaded automatically. To download specific files, just navigate through the uploads folder and select the media files you need before downloading them.
It’s easy and fast – one of the reasons why most choose to use plugins instead of the previous methods above. However, do keep in mind that it can be a little unsafe. So for security purposes, it’s better to deactivate and delete the plugin once you’re done using it.
Conclusion
Downloading your media files can be useful when you have to back up your website or if you need to transfer files between sites. It’s not a complicated process, in fact, you are given three options on how you can do it:
- Through the file manager on your hosting service control panel.
- From your computer’s desktop through an FTP client.
- By using a WordPress plugin that lets you access your files from the WordPress Dashboard.
Pick whichever method most comfortable and easy for you. It’s really easy to download single image from the WordPress media library. Good luck!
 Next Post

